Spam Master is the professional solution to protect software and hardware from spam and online threats.
Spam Master is available for WordPress, Drupal, Joomla and other platforms via API. After installing Spam Master, just insert a connection, license key in your plugin, module or component Settings page and you are set to go.
All management is done via our website www.spammaster.org. If you haven’t created an account, please do so via top menu Login.
- Free Key: Check your plugin, module or component Settings page for the attached email. Create an account with that email.
- Pro Key: Create an account with the email used during purchase or checkout.
It’s important to create the account with your main email address to receive important notifications about your license, firewall, exploit attempts, etc.
If your main email address is different from the above free attached email or Pro purchase email, not to worry you will be able to transfer the licenses to your main email address. Same applies if you have several websites with several licenses with several emails, you will be able to manage all websites from one main email account. Refer below to Licenses section Transfer License.
Go ahead, create an account with your main email address and login.
After login with your main email address click the top right button and click My Account.

- Profile: Allows you to manage your account settings like First Name, Last Name, Time Zone, etc.
- Licenses: Allows you to manage your licenses, add, transfer, configure license options, etc.
- Firewall: Allows you to view and manage your website(s) firewall with allowed, blocked, whitelisted accesses.
- Statistics: Allows you to view your website(s) data and important website(s) analytics via easy to comprehend charts and lists.
- Actions : Displays all end to end connections between our servers and your website(s).
Let’s take a closer look at each menu section and it’s options.
Manage your personal account data.
- First Name: Your first name.
- Last Name: Your last name.
- Website: Your main website.
- Time Zone: Your time zone. Usually date and time is displayed GMT 0 or UTC 0 which is London/Lisbon time zone. You can change the date and time to reflect your time zone. Use the drop-down menu to select your city, country (+ or -) time zone.
Licenses menu and sub menus.

In the example screenshot above we see that the top menu licenses contains a green round bubble displaying 0. That means that there aren’t any current issues with the used licenses. If the bubble is red, orange or yellow and displays a number other than 0 then you should address the issue(s) in the below licenses table.
Add Free License
Allows you to add 1 Free license to be used by a website with WordPress, Drupal or Joomla.
- Website: Insert the website URL the license is destined for, example: https://www.example.com.
- Your Role: Brief comment of your role in this website.
Get Pro Business Class License
Allows you to Buy a single Pro license or a pack of 5 or 10 Pro licenses to be used across your websites.
A license costs peanuts per year and hugely improves your website performance with end to end connections to our premium business servers. You can check the connection times here. Pro licenses also allow for the implementation of specific license options and real-time immediate connections with Actions.
What are you waiting for? Get Pro License.
Upgrade Pro License
If you have a Pro license you can easily upgrade to 5 or 10 licenses only paying the difference between prices. Upgrade.
Transfer License
Allows you to transfer license(s) to a single main email account.
You can transfer your Free attached email license or Pro purchase email license to your main email account.
If more than one license, you can transfer them all to your main email account to manage (licenses, options, firewall, statistics, etc.) from a single place.
- Email: Insert the license email, either Free attached email or Pro purchase email. Check Spam Master in your website to get the license email.
- License: Insert the license key. Check Spam Master in your website to get the license or connection key.
Once you press Transfer License, check the original licence key email inbox and click the Validation Link to allow the transfer to your main email account.
Licenses Table, List
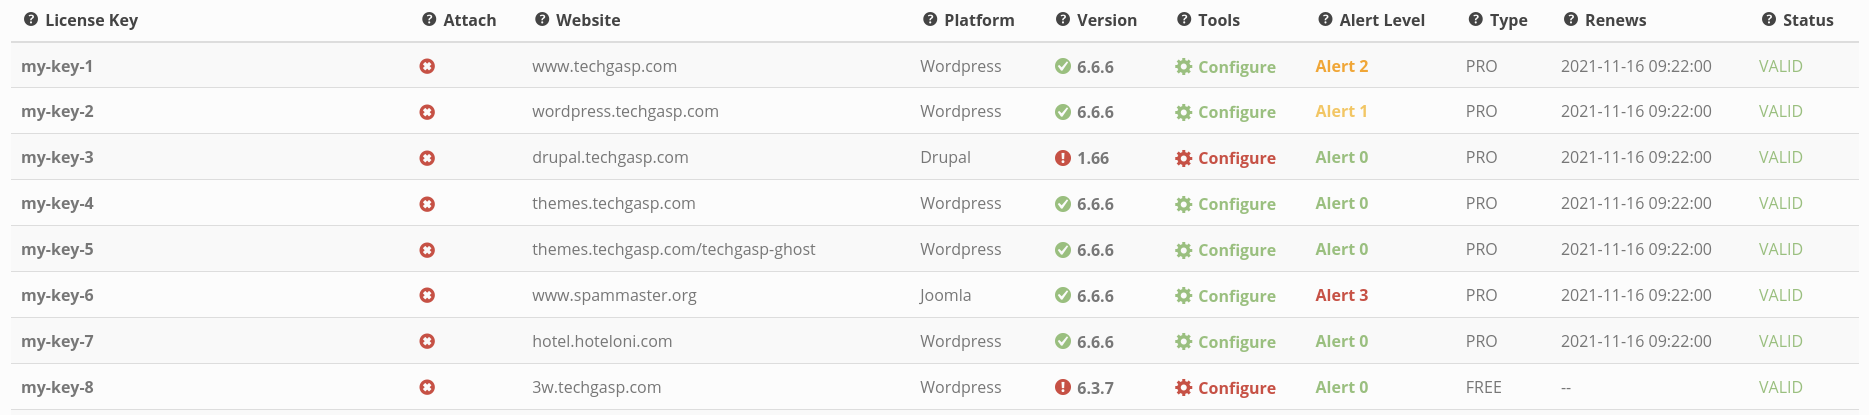
Below the top Licenses menu and sub-menu there’s the Licenses Table with all your current manageable licenses.
License Key
Displays your License or connection keys. If you don’t have one yet, click the top menu Get Pro Business Class License or Add Free License.
Attach
Displays if license is attached to a website.
Correct Detach method: go to your website, Spam Master Settings page and remove or replace the license with another license, press Save. Afterwards press in this Table.
Correct Attach method: the license should display “Available” and not attached to any website (no red here), simply insert the license in your website inside Spam Master Settings page and press Save. Afterwards refresh this Table and the license will display the attached information.
Following the above process you can re-use or move the license to a different website. Remember 1 unique license key per website database spam-master table.
Website
Displays the website domain the license is attached to or in other words, the website using the key.
Platform
Display the website platform WordPress, Drupal, Joomla, API, etc. using the key.
Version
Displays the Spam Master version currently installed in the website / platform. Spam Master is all about security, it’s really important you keep Spam Master up-to-date with the latest release versions.
Your version is up-to-date.
Your version is not up-to-date. This warning can display if you updated Spam Master within 24H, max time it takes for your website to sync with our servers. If you want to speed up the Sync process go to your website Spam Master Settings page and press Re-Sync Key button. Also, if your Spam Master version is not up-to-date, it affects other advanced parts of license, firewall, etc. For instance, take a look at the above screenshot and you will see 2 licenses with , in this state the Tools can not be configured and will display a red Configure button .
Tools
Clicking green Configure button allows you to manage the behavior of Spam Master in your website. You may have several licenses for several websites and each Spam Master installation may behave differently according to the options you activate here. Example:
- in one installation you might want to scan the contacts or comments text with heuristics and in another installation you might not want to scan the text or might not even be using comments or contacts
- or, you might want to individually turn off Spam Master signatures text “Protected by Spam Master” on login, registration, comment forms or emails
- or, you might want to disable daily, weekly report emails
- etc… many other options
Just turn them ON or OFF as you please.
Alert Level
The Threat Alert Level automatically displays your website spam & threat alert levels. It’s an easy and interactive way for you to know if your website is being targeted by spammers and the level of intensity or danger of this targeting. The update is done daily and automatically via our RBL servers sync. The alert levels range from 0 (low) to 3 (high) intensities. According to each level you may which to implement different strategies using the Tools Page. Below is explained each Alert Level and it’s meaning:
Alert 0
Normal low intensity alert level of spam and threats. Your website is mainly and only being visited by occasional harvester bots, nothing to worry about. No action needed.
Alert 1
Normal low intensity alert level of spam and threats. Your website is mainly being visited by occasional human spammers and harvester bots, nothing to worry about. No action needed.
Alert 2
Medium intensity alert level of spam and threats. Your website is being visited by an abnormally high amount of proxy Ip’s and Spam Master is actively fighting constant attempts of spam and threats by human and machine bots. You should visit your site regularly including Spam Master Settings page to check if your alert level changed. We at TechGasp are probably monitoring your website and if you desire more info about what is going on you may contact us, we will be happy to tell you what is going on even if you have a Free License.
Alert 3
Warning! High intensity level of spam and threats. Your website is under attack and Spam Master is fighting an array of human spammers and bot networks. You are receiving hundreds of registrations or comments daily by full bad Ip networks and Ip proxies which include known exploit website attempts, flooding and DDoS, SQL injections and brute force attacks. Spam Master automatically locks down your website registrations and comments to keep it safe. You should visit Spam Master Settings page daily to check if your alert level decreased. Alert 3 means that we at spammaster.org are personally monitoring your website and if you desire more info about what is going on you may contact us, we will be happy to help you even if you have a Free License.
Spam Activity Probablilty
In conjunction with the Alert Level, Spam Master advanced detection heuristic analytics will provide you with an approximated percentage of all activity in your website. The percentage can range from 0 to thousands according to the spam activity on your website. The lower the number, the better.
Type
The type of license key. Pro, Free, API, etc.
Renews
License renewal date, only applicable to Pro and API. Free licenses are always valid and do not renew.
Status
Display the license key status on your website. The normal status is VALID (green color). Below is a list of other license status that require your attention and correction.
VALID
Perfect status. Everything is up and running, no action needed.
Malfunction_1
Spam Master is Active & Online but needs to be updated to the latest version. The warning will auto disappear once Spam Master is updated and re-syncs with the RBL servers. Might take up to 24 hours. Pressing the Re-Sync Button on your website Spam Master Settings page immediately changes the status. Very old and unattended Spam Master installed versions may lead to Disconnected status, read more below.
Malfunction_2
Spam Master is Active & Online but your license key is being used in more than 1 website. It’s important to use 1 single unique license per website
- 1. Remove, replace the license from any website except for one.
- 2. In our Licenses Table, detach the license from all websites except for one.
- 3. Refer to Attach section above.
Unattended cases, Malfunctions_2 can escalate to Malfunctions_6 or other Inactive states.
Warning will auto disappear once malfunction is fixed and Spam Master re-syncs with the RBL servers. Might take up to 24 hours. Pressing the Re-Sync Button on your website Spam Master Settings page immediately changes the status.
Malfunction_3
Spam Master is Inactive & Offline. You are not protected. Something is seriously wrong.
- Single Pro license being used in more than 1 website.
- Server listed as a spam source.
- Internal error.
- Intrusion detection.
- Etc.
Except for the first case where you can upgrade your license to 2 – 5 websites Upgrade License, Malfunctions_3 do not auto fix themselves . You should get in touch with www.spammaster.org support and refer Malfunction_3 so we can help you troubleshot the issue.
Malfunction_4
This issue occurs after installing Spam Master on your website. Spam Master was unable to automatically generate a FREE Connection Key for your server. The most common reasons are that your website’s Administration Email Address is either empty or already associated with an existing key. Don’t worry! You can check which connection key is linked to your email by logging in at spammaster.org, or you can obtain a new free connection key by clicking Add Free License.
Malfunction_5
This malfunction occurs after Spam Master installation in your website platform. Spam Master was not able to automatically Generate a FREE Connection Key on your server because the daily limit of free keys was exceeded in our free rbl servers. Please try again tomorrow or get a Pro Key.
Malfunction_6
Escalation of Malfunction_2 Key. Spam Master is Inactive & Offline. Your single unique key is assign to more than one website please follow instructions of malfunction_2 and make sure your key is attached to 1 single website. If you have several development or test websites make sure to set Website Type as “Test – Development”, read more at bottom of page. Need more licenses… add Pro Keys as needed.
Malfunction_7
This malfunction occurs after Spam Master installation in your website platform. Spam Master was not able to automatically Generate a FREE Connection Key in your server, most likely reason is an old and out of date Spam Master installed version, simply update Spam Master to the latest version and get a new free connection key pressing Add Free License (read above Add Free License).
Malfunction_8
This malfunction occurs after Spam Master installation in your website platform is behind a CDN, WAF.
For instance Cloudflare or Fastly mask the end users IP addresses with proprietary CDN / WAF IPs making Spam Master work extra hard to scan the real end user IP.
Cloudflare: To see the end users IP address you need to login to your Cloudflare dashboard and activate True-Client-IP https://support.cloudflare.com/hc/en-us/articles/206776727-Understanding-the-True-Client-IP-Header.
Fastly: To see the end users IP address you need to login to your Fastly dashboard and activate Fastly-Client-Ip https://developer.fastly.com/reference/http/http-headers/Fastly-Client-IP/.
Amazon Cloudfront: To see the end users IP address you need to login to your Amazon dashboard and set True-Client-IP HTTP header to the request https://docs.aws.amazon.com/AmazonCloudFront/latest/DeveloperGuide/example-function-add-true-client-ip-header.html.
- If you are able to activate any of the above CDN settings your module or plugin should have the CDN, WAF setting turned OFF
- If you are not able to set “True-Client-IP” or “Fastly-Client-Ip” in your CDN dashboard your module or plugin should have the CDN, WAF setting turned ON.
It’s a good idea to get in touch via contact with our support team so we can test and advise you.
Expired
Only applies to Pro Keys. Spam Master is Inactive & Offline. You are not protected because your Pro License expired. If you enjoyed the bombastic protection provided by Spam Master you can get another Pro license, it costs peanuts per year, get Pro Key.
Unstable
Only applies to Free Keys. Spam Master is Inactive & Offline. You are not protected because there’s an high demand of spam checks in our free servers at this point, please check the RBL server status Free Server Cluster Status here and wait 4 to 24 hours for the free service auto regain stability. If you want to avoid these issues in the future with 100% up-time spam checks you might want to consider a Pro Connection Key… It costs peanuts.
High Volume
Spam Master is Inactive & Offline. Heavy load of spam checks & exploits affecting FREE licenses. If your website is experiencing HIGH_VOLUME malfunction wait +24 hours for free re-connection slot. If you have an High Volume website that needs thousands of real time checks we recommend using a Pro Connection Key to be 100% fully protected at all times.
Disconnected
You are not protected because your website can not connect to the RBL servers to perform scans. Most common reason for this occurrence is an outdated, old Spam Master installed version in your website. It’s usually preceded by unattended Malfunction 1. Easy to fix… make sure to update Spam Master to the latest available version and after Re-sync or refresh the license in your website Spam Master administration page.
Code_Tamper
Altered code detected. You are not protected… programmatic changes may affect Spam Master functionality and in worse case scenarios may facilitate malicious activities like DoS attacks or injection exploits.
Altering Spam Master code and or hidding Spam Master Signatures, Spam Master Honeypot V2 & Spam Master Anti-bot fields with a FREE key is also known to cause Code Tamper malfunction. If you want to disable Spam Master signatures use Protection Tools -> Signatures. For exact information get in touch with our Support team.
Firewall menu and Whitelist sub-menu.

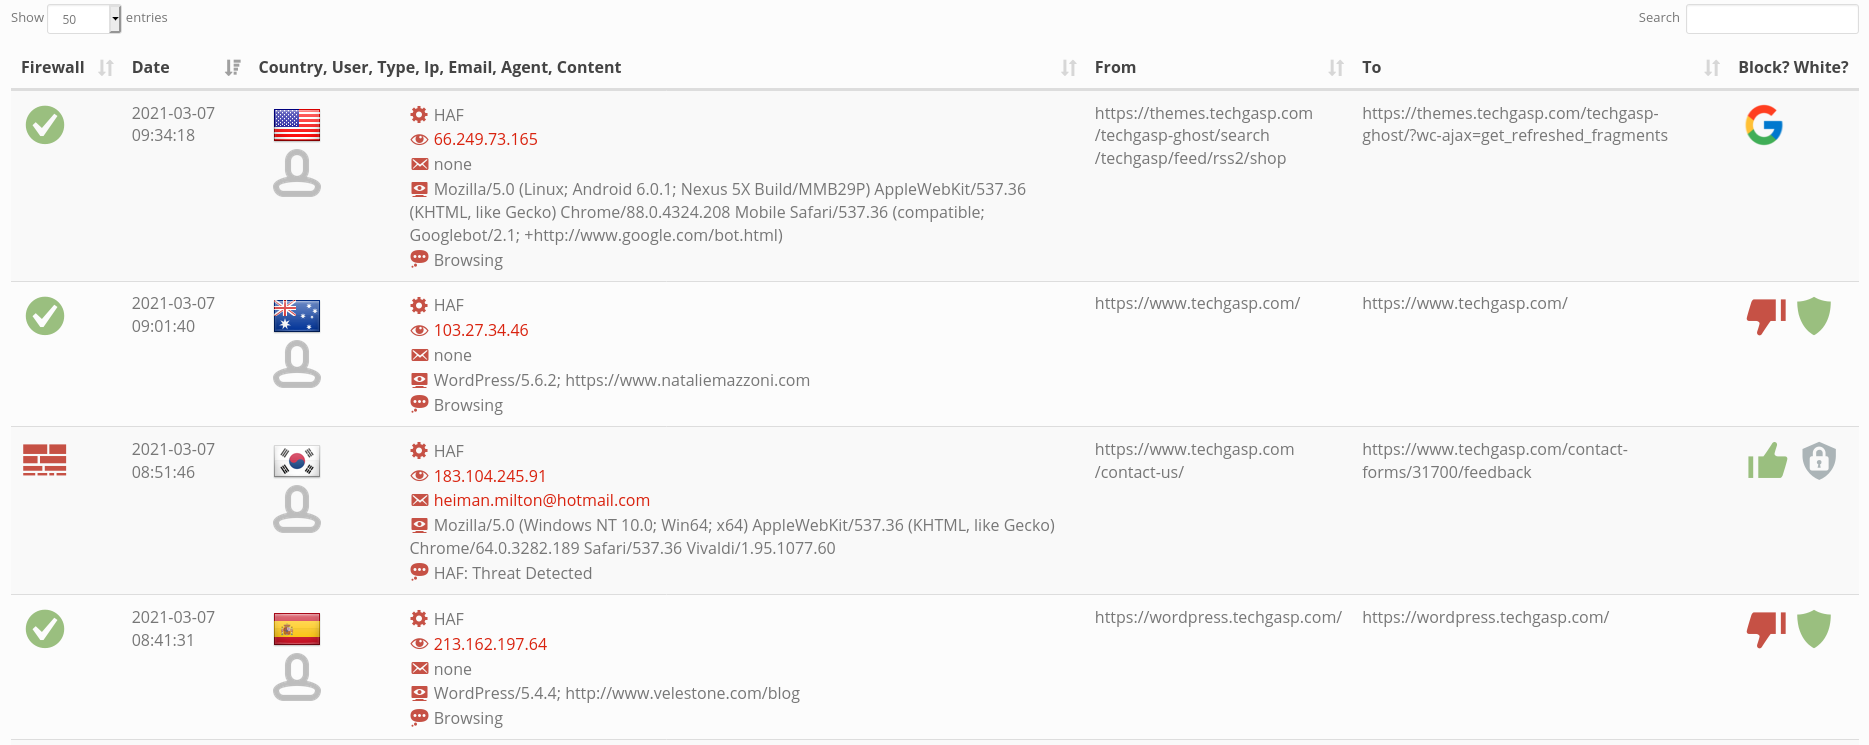
The Firewall displays and allows you to mange all your website(s) accesses for the last 7 days. This table is packed with concise information per IP and allows you to override the decision taken by the Firewall to allow or block that specific IP access. Let’s take a look at below example table.
Show 50 entries & Search Field
Show entries allows you to control de amount of entries per Firewall page.
Search Field allows you to quickly filter the table as you type. For instance an IP, an email, browser agent, etc.
Firewall
Displays the action taken by the Firewall. Can be overridden by you in Block? White?, read below.
the Firewall Approved / Allowed the access.
the Firewall Blocked / Denied the access.
Date
The Date and Time the access occurred. If you haven’t done so, remember to set your time zone in top menu Profile.
Country, User, Ip, Email, Agent, Content
Displays all information gathered from a specific access.
- type of scan performed by Spam Master. The Most common is HAF “High Availability Firewall”, but it can also be Registration, Login, Contact Form, Comment, etc. Accesses can be scanned several times example, HAF Comment Heuristics until they either get Allowed or Denied by Spam Master.
- the Ip.
- the email if applicable.
- the browser agent.
- the content if any. Example, if a user is browsing the website there is no content but on the other and if it’s a comment or a contact the content can be scanned and displayed here if these actions are enable in the License Tools Configure.
From
The referrer webpage, where the access comes from.
To
Your website destination page, where the access is trying to reach.
Block? White?
With these actions you can override the Firewall behaviour.
- if the Firewall approved the access you can:
- Block future accesses from this specific IP.
- Add this specific Ip to the Whitelist and exempt the Firewall from scanning the majority of accesses.
- The specific Ip is in your Whitelist, removes it from your whitelist.
- if the Firewall blocked the access you can:
- Allow future accesses from this specific IP.
- No action can be taken with the whitelist since the Ip is blocked. To whitelist you first need to remove the Firewall Block.
Whitelist
Firewall sub-menu Whitelist allows you to view and manage your current whitelisted Ip’s and Emails.
Keep in mind that website administrators are whitelisted by default, hence are not required to be added to the whitelist.
Special notice regarding emails. By default it’s not a good idea to whitelist emails since many times spam bots gather emails from your website and other online sources and use them to spam.
Special notice regarding Ip’s. By default whitelist functions perfectly with static Ip’s. If you are trying to whitelist DHCP or dynamic ip’s these change overtime and renders them unuseful.
How to add ip’s or emails to your whitelist:
- Via the Firewall Table.
- Via the Whitelis sub-menu insertion box:
- Insert your Ip or Email.
- Select your website from the dropdown.
- Click Add.
Important!
All your interaction with the firewall and whitelist gets queued and is visible in Actions. Please take a look at the last section of the documentation.
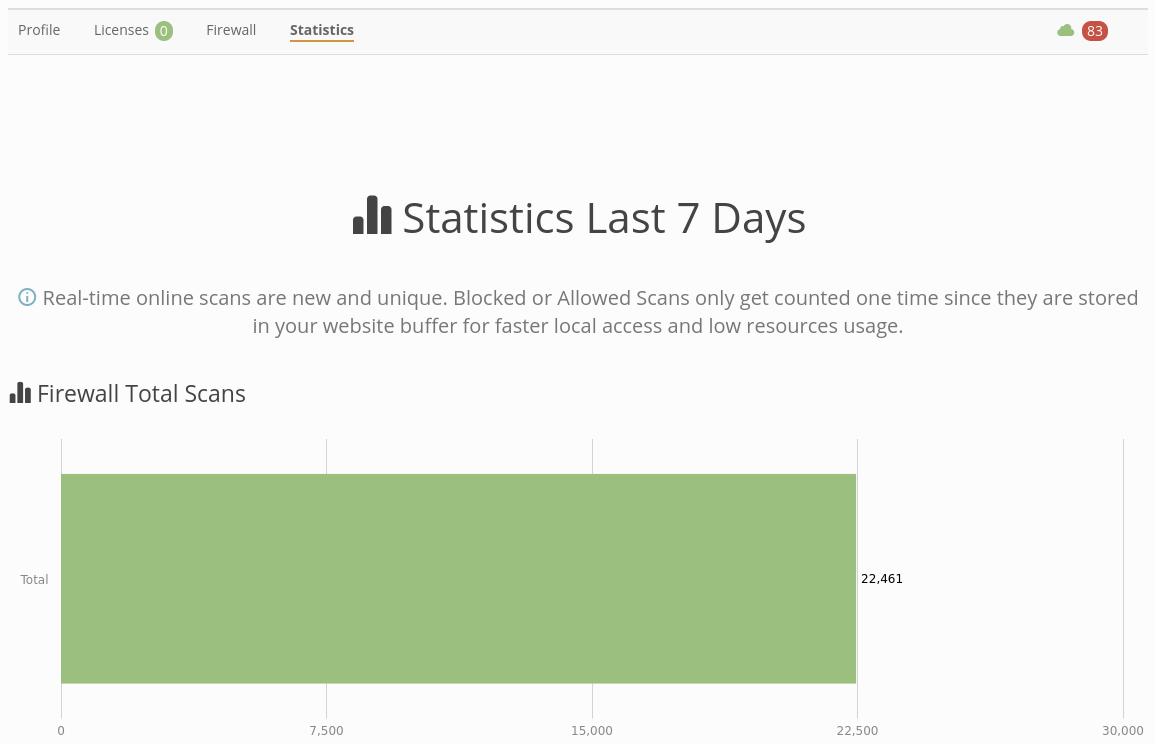
The Statistics menu gives important insights about your website(s) activity and is of the out-most importance for business analytics and management. We already have a huge array of charts, lists & reports and are constantly adding more. If you need a specific chart or list please get in touch with us.
Actions menu displays all end to end communications between our RBL servers and your website(s). All your actions across www.spammaster.org in Licenses Tools Configure, Firewall Allow or Deny, Whitelist Add or Remove, etc. allow you to control Spam Master behavior in your website(s) and get stored here for 7 days.

- Data Successfully Synchronized with your website. With a Pro Key synchronizations are done immediately or real-time.
- Data Synchronization is Pending. We will retry in 24H.
- Data Synchronization is failing. Our server will keep trying a Sync with your website for the next 24h.
The Website Type selector refers to Spam Master implementation type, Live Production website or Test Development website. You can find the drop-down selector in your website Spam Master Settings page.
- Live – Production: Active Spam Master Saas protection with real time scans via the usage of 1 unique license key.
- Test – Development: No protection is done. It’s assumed this is a dev, local, stage machine running locally or on the internet protected behind .htpasswd. If you require a full blown Spam Master Saas protection for your development, stage, test machines you may select Live – Production but keeping in mind it needs 1 unique license (different from any other production license key) to be protected by our service.